[딥러닝] mnist 데이터 학습으로 손글씨 숫자를 판별할 수 있을까?
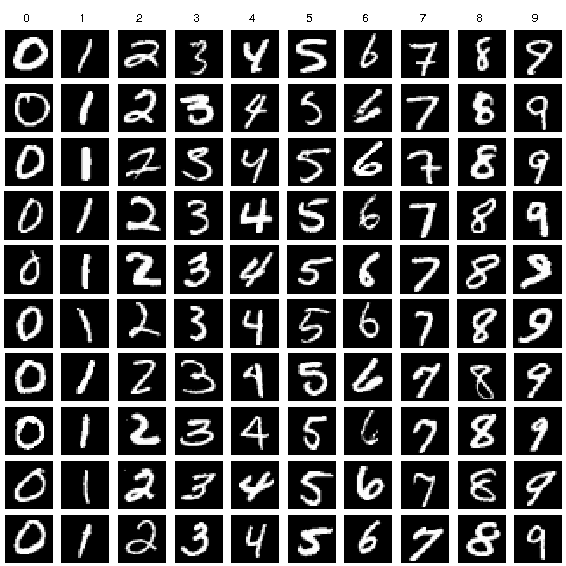
mnist 데이터셋은 handwritten digits(손글씨 숫자)로 이루어져있다.
28 * 28 pixel 단위의 박스로 감싸져있고, grayscale화 되어있다.
기계가 손글씨(입력값)를 보고 해당하는 숫자(출력값)를 추측하도록 하는 것이
mnist 모델링의 핵심목표이다.
# kaggle API Token 입력
import os
os.environ['KAGGLE_USERNAME'] = 'kimpearl' # username
os.environ['KAGGLE_KEY'] = '5256160a022840baa11247040cf36dad' # key

# 데이터셋 불러오기
!kaggle datasets download -d oddrationale/mnist-in-csv

# 압축 풀기(.csv 파일)
!unzip mnist-in-csv.zip

# 필요한 라이브러리 import
from tensorflow.keras.models import Model
from tensorflow.keras.layers import Input, Dense
from tensorflow.keras.optimizers import Adam, SGD
import numpy as np
import pandas as pd
import matplotlib.pyplot as plt
import seaborn as sns
from sklearn.model_selection import train_test_split
from sklearn.preprocessing import StandardScaler
from sklearn.preprocessing import OneHotEncoder

# pandas로 .csv 파일의 상위 5개 읽어오기
train_df = pd.read_csv('mnist_train.csv')
test_df = pd.read_csv('mnist_test.csv')

train_df.head()
test_df.head()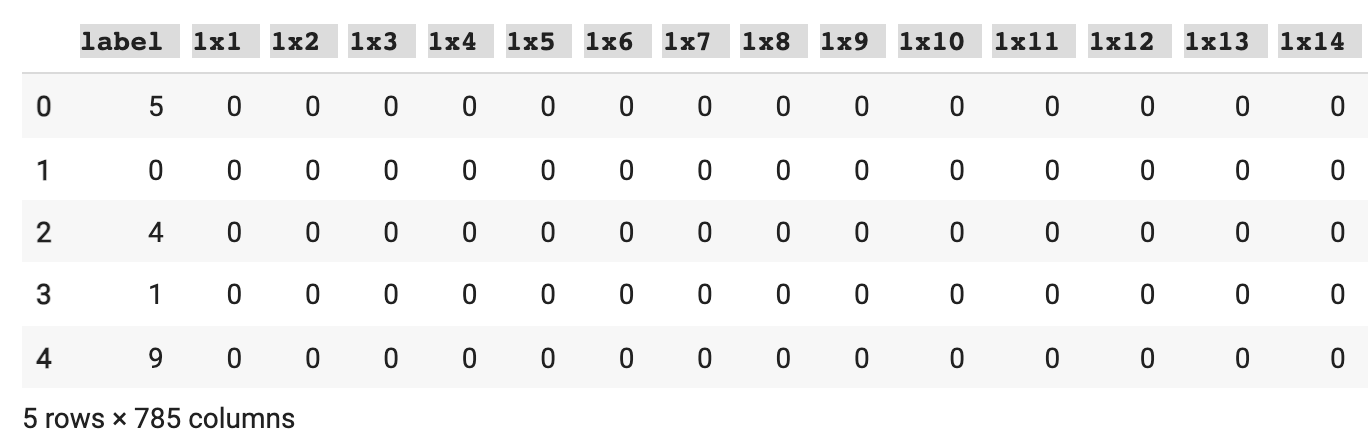
1 * 1 부터 28 * 28 까지의 데이터로 구성되어있는데,
좌표위의 이미지로 생각하면 데이터의 모양을 쉽게 이해할 수 있다.
# label 갯수 그래프
plt.figure(figsize=(16, 10))
sns.countplot(train_df['label'])
plt.show()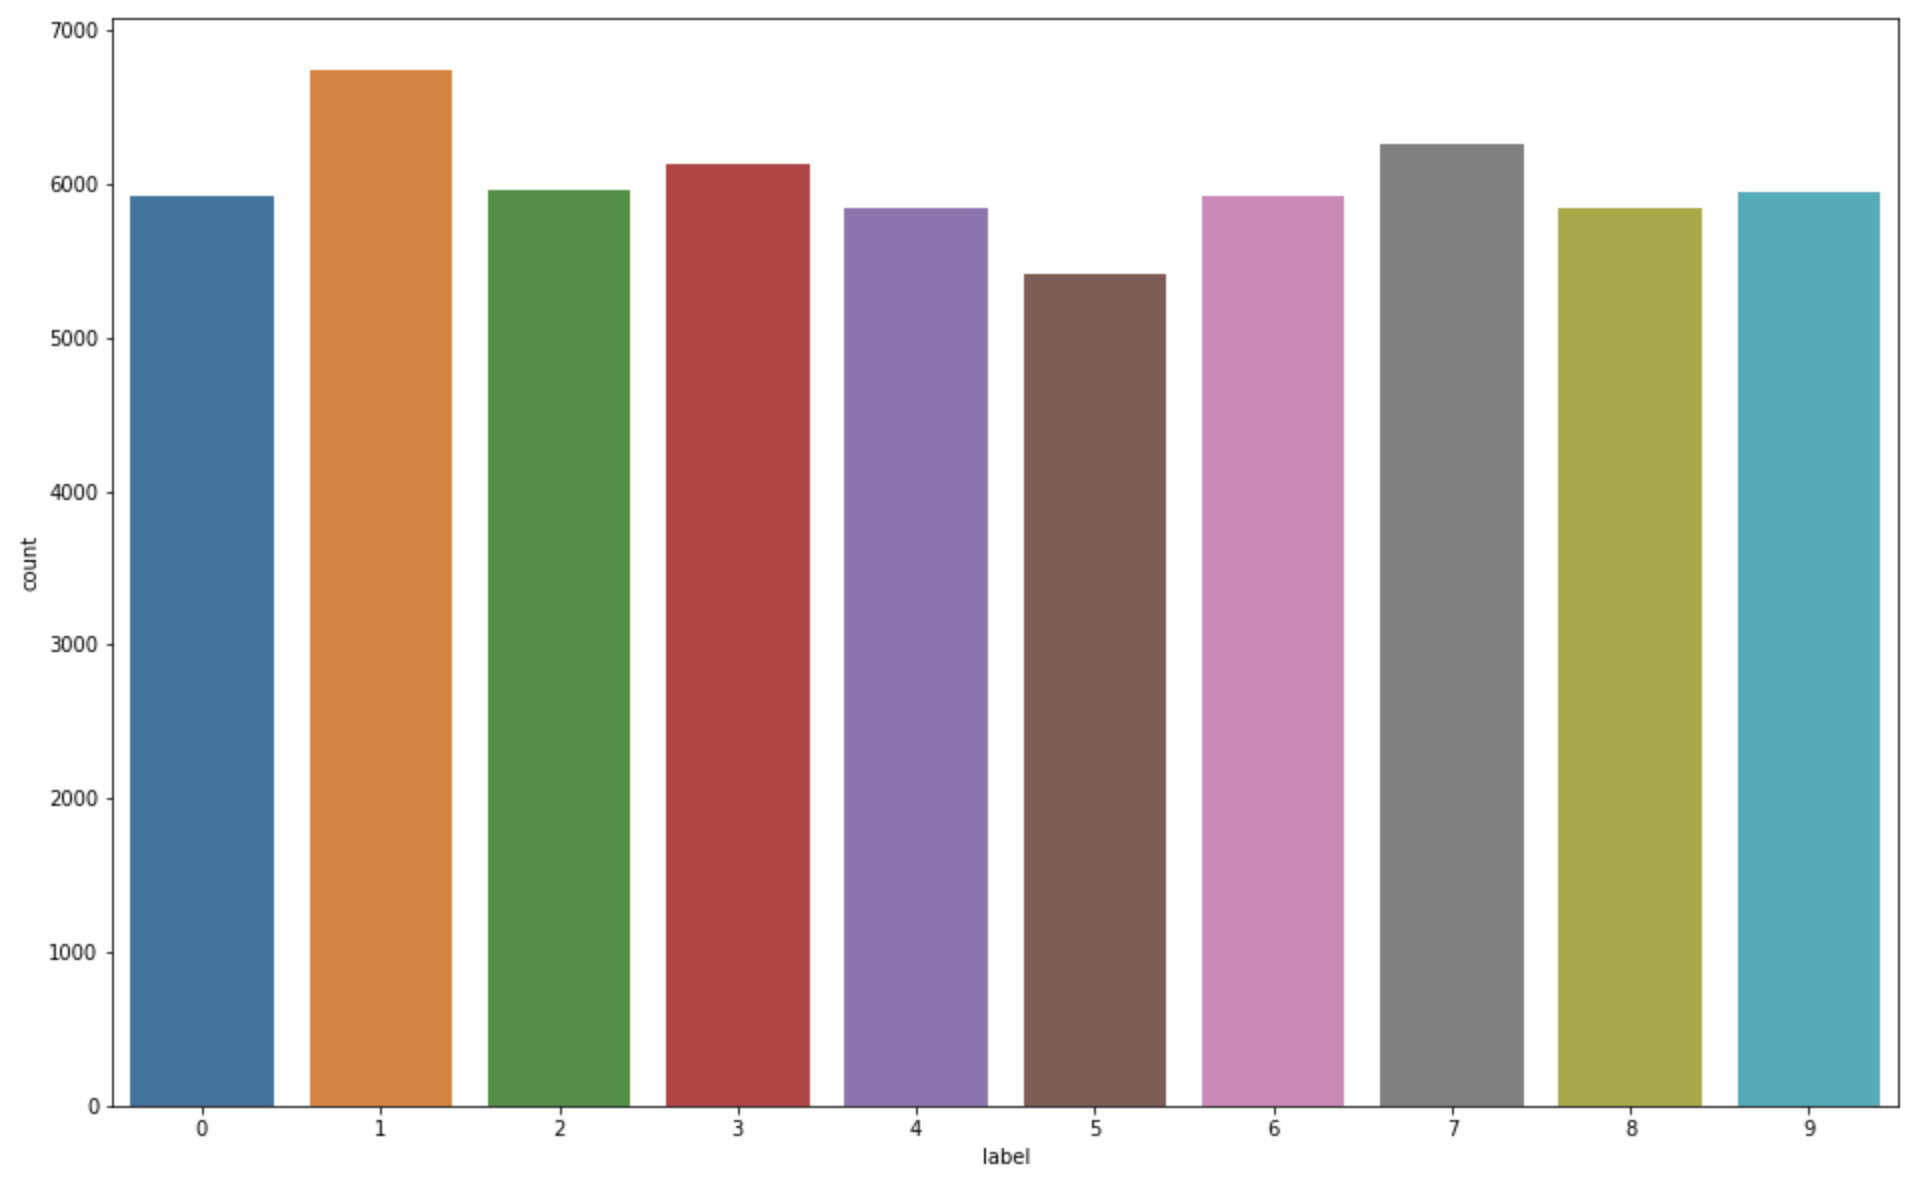
# x 데이터와 y 데이터로 데이터를 분할
train_df = train_df.astype(np.float32)
x_train = train_df.drop(columns=['label'], axis=1).values
y_train = train_df[['label']].values

test_df = test_df.astype(np.float32)
x_test = test_df.drop(columns=['label'], axis=1).values
y_test = test_df[['label']].values

print(x_train.shape, y_train.shape)
print(x_test.shape, y_test.shape)

# 출력값
# input데이터는 784개, output데이터는 label로 1개
(60000, 784) (60000, 1)
(10000, 784) (10000, 1)

# index 2번째(label : 4) 이미지 미리보기
# y index 2번째 label값인 4를 title로 표시
# x index 2번째 이미지를 reshape하여 grayscale로 보여주기
index = 2
plt.title(str(y_train[index]))
plt.imshow(x_train[index].reshape((28, 28)), cmap='gray')
plt.show()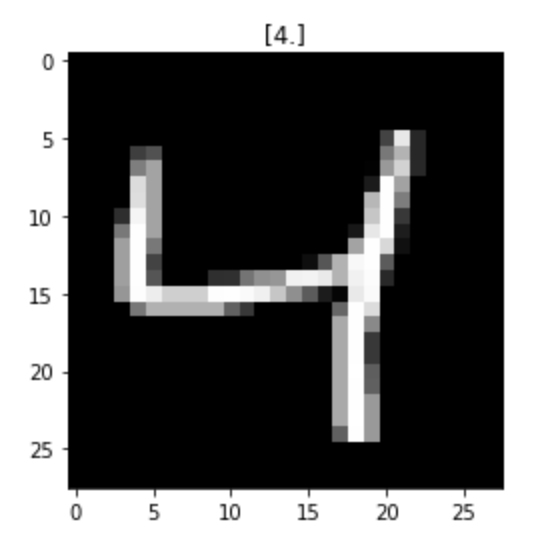
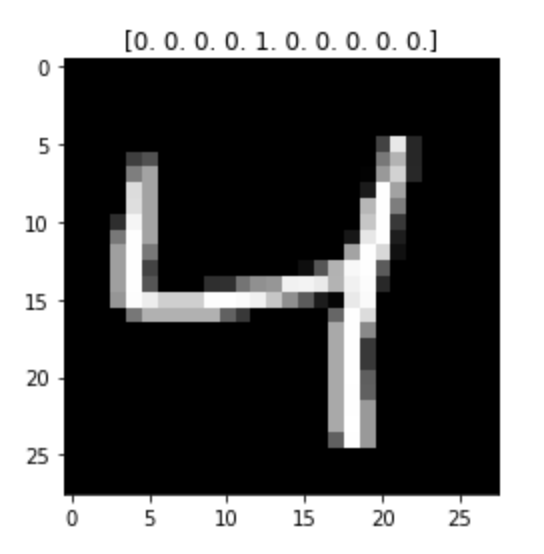
# 원핫인코딩으로 y 출력값인 숫자를 0,1로 변형시켜줌
encoder = OneHotEncoder()
y_train = encoder.fit_transform(y_train).toarray()
y_test = encoder.fit_transform(y_test).toarray()

print(y_train.shape)
one hot encoding을 사용하면, title의 숫자 4가 아래와 같이 배열로 바뀌어 표시된다.
이미지 데이터는 픽셀이 0-255 사이의 정수(unsigned integer 8bit = uint8)로 되어있다.
이것을 255로 나누어 0-1 사이의 소수점 데이터(floating point 32bit = float32)로 바꾸고
일반화 시키는 작업이 필요하다.
# 한번만 실행해 주기!
x_train = x_train / 255.
x_test = x_test / 255.
이제 데이터는 준비가 되었으니 모델을 만들어보자.
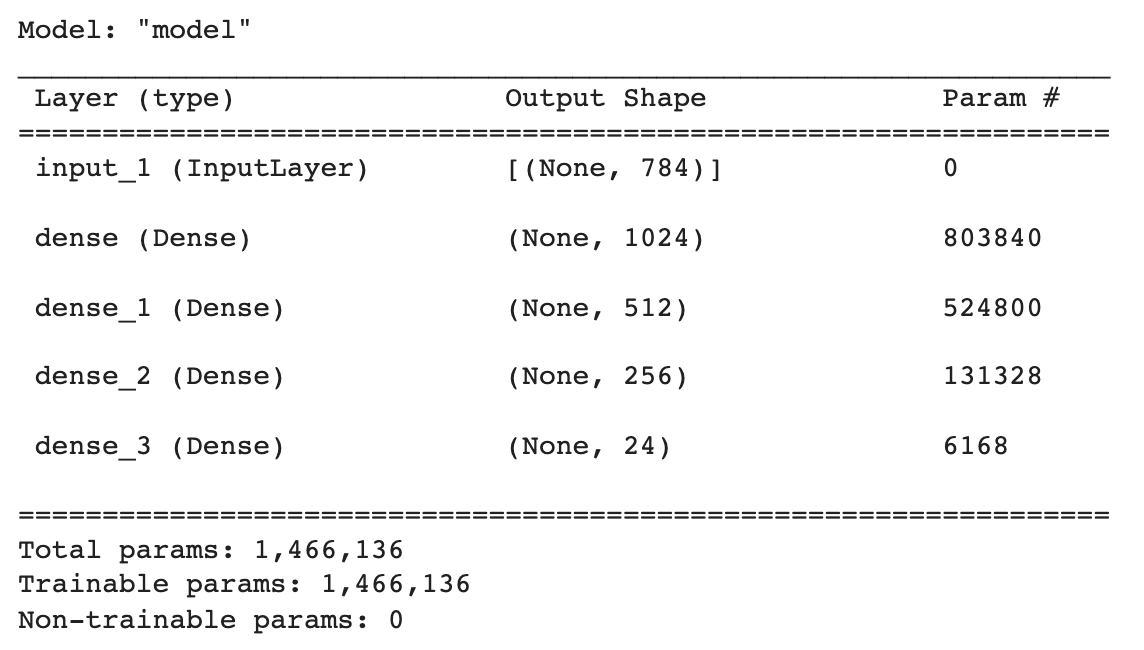
input = Input(shape=(784,))
hidden = Dense(1024, activation='relu')(input)
hidden = Dense(512, activation='relu')(hidden)
hidden = Dense(256, activation='relu')(hidden)
output = Dense(10, activation='softmax')(hidden)

model = Model(inputs=input, outputs=output)

model.compile(loss='categorical_crossentropy', optimizer=Adam(lr=0.0005), metrics=['acc'])

model.summary()
input 데이터의 갯수가 784개임으로 shape를 784로 설정하고,
hidden node의 수를 적절하게 주고, 임계치를 지정하여 다음 node로 넘어갈 수 있도록
활성화 함수인 reLU를 사용하여 데이터값을 다음 layer에 연결한다.
output은 총 10개의 label 결과값임으로 10으로 설정하고, softmax를 사용하여 가중치를 %화하여 출력한다.
출력값이 2개 이상임으로 categorical crossentrophy를 사용하여 손실함수를 만들고,
learning rate는 0.0005로 설정한다. metrics를 활용하여 정확도(acc)도 함께 측정한다.
(learning rate를 0.001로 설정하면 최소 loss 값을 구할 수 없어서 0.0005로 설정하였다.)
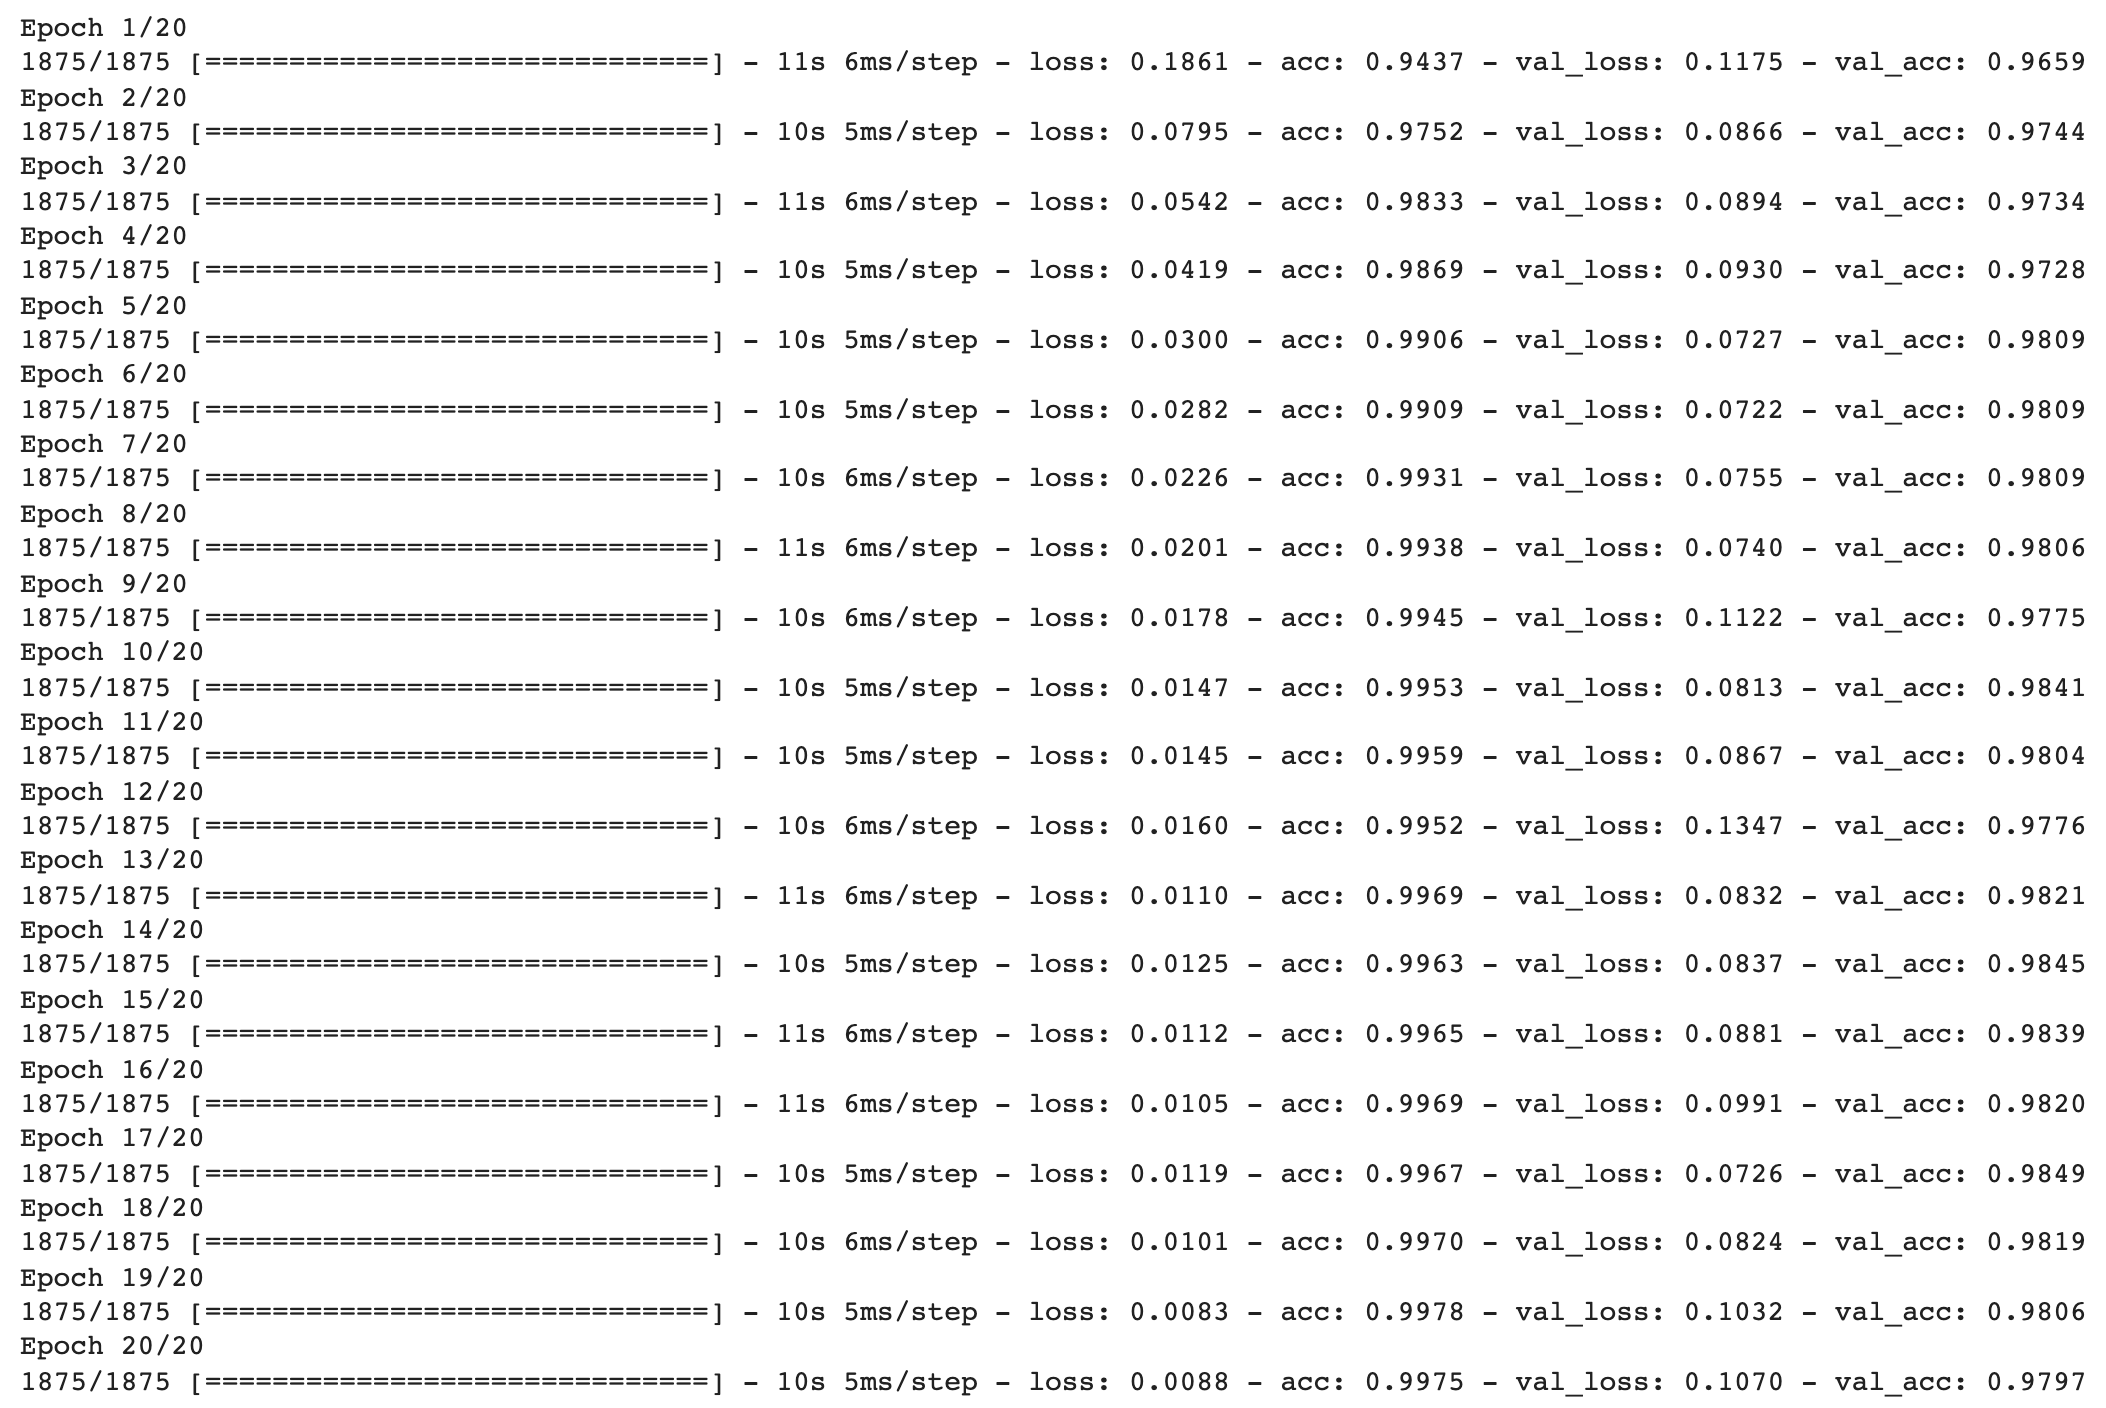
만들어진 모델을 학습시키자.
history = model.fit(
    x_train,
    y_train,
    validation_data=(x_test, y_test),
    epochs=20
)
# loss 값의 변화 그래프
plt.figure(figsize=(16, 10))
plt.plot(history.history['loss'])
plt.plot(history.history['val_loss'])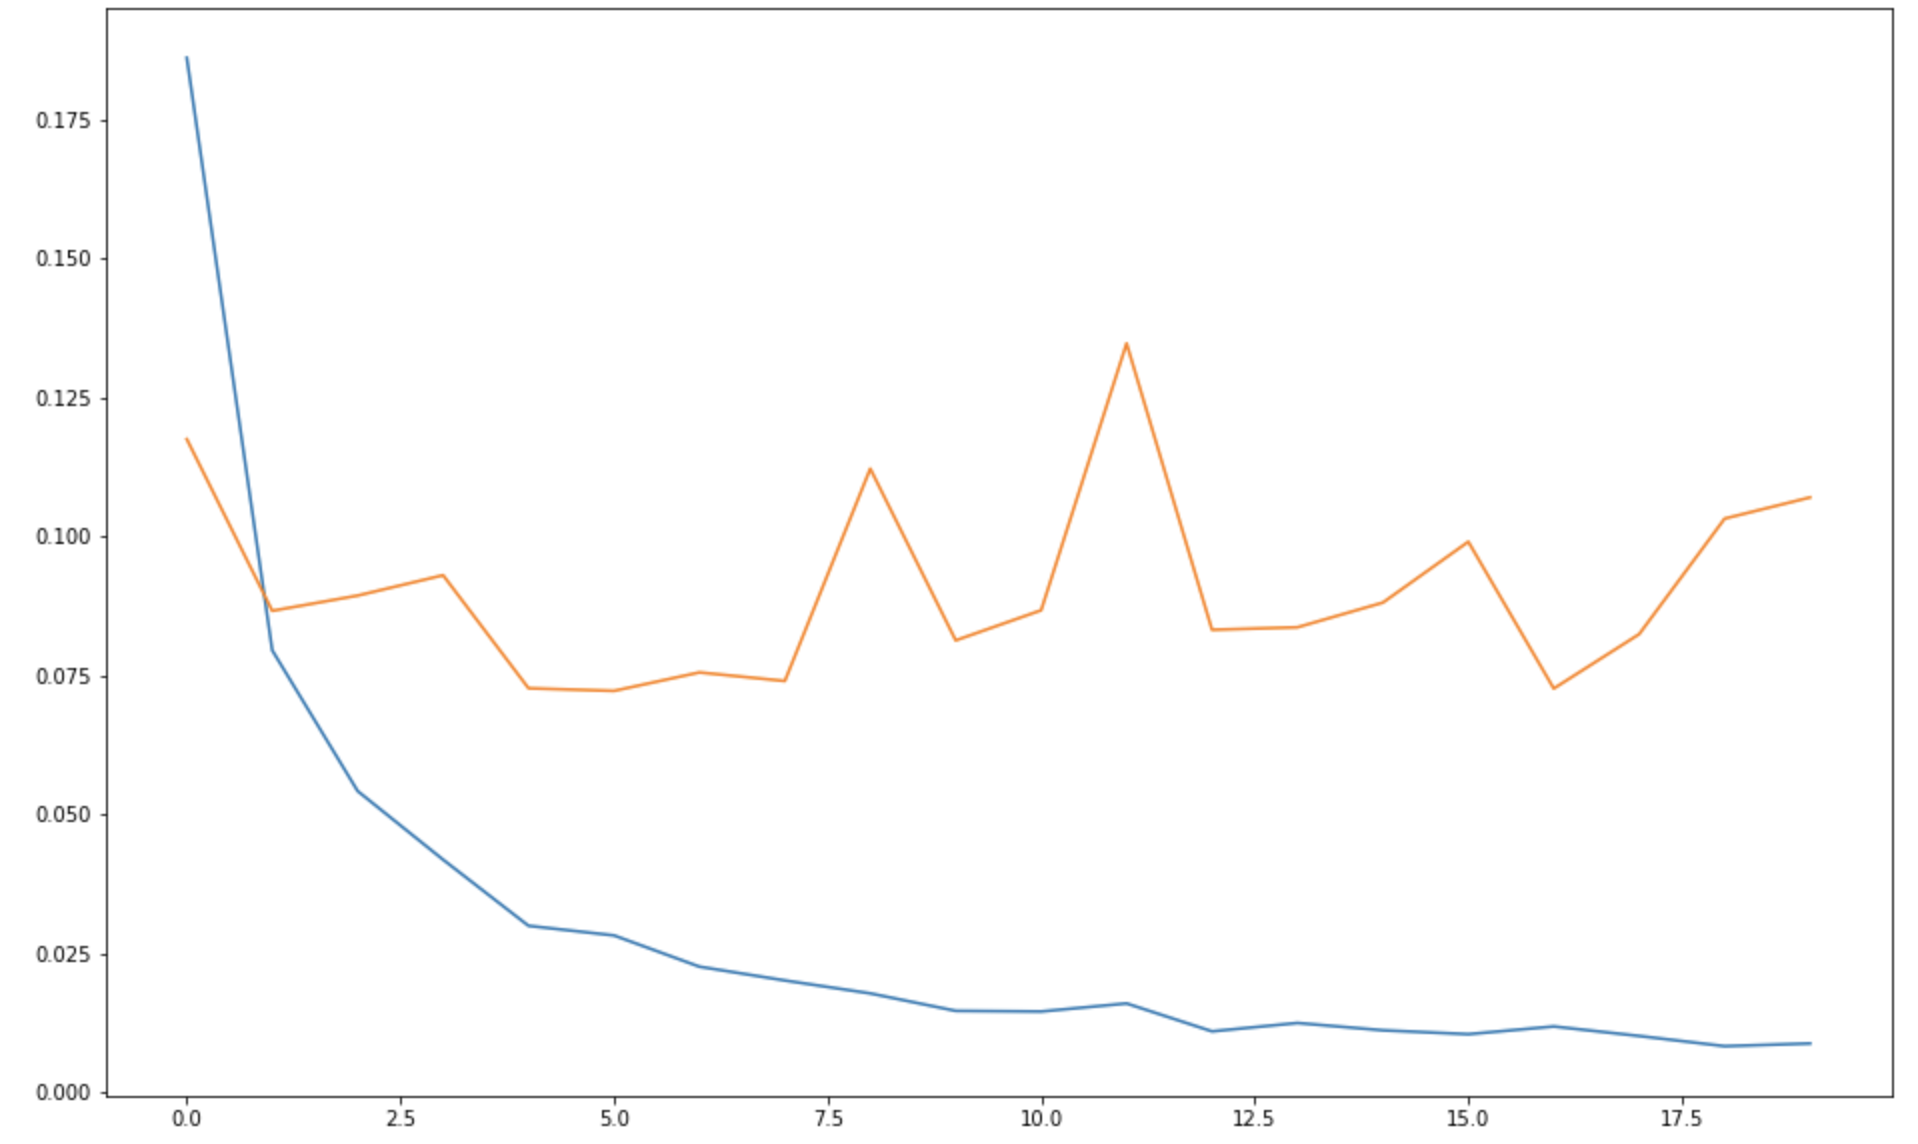
# 정확도(acc)의 변화 그래프
plt.figure(figsize=(16, 10))
plt.plot(history.history['acc'])
plt.plot(history.history['val_acc'])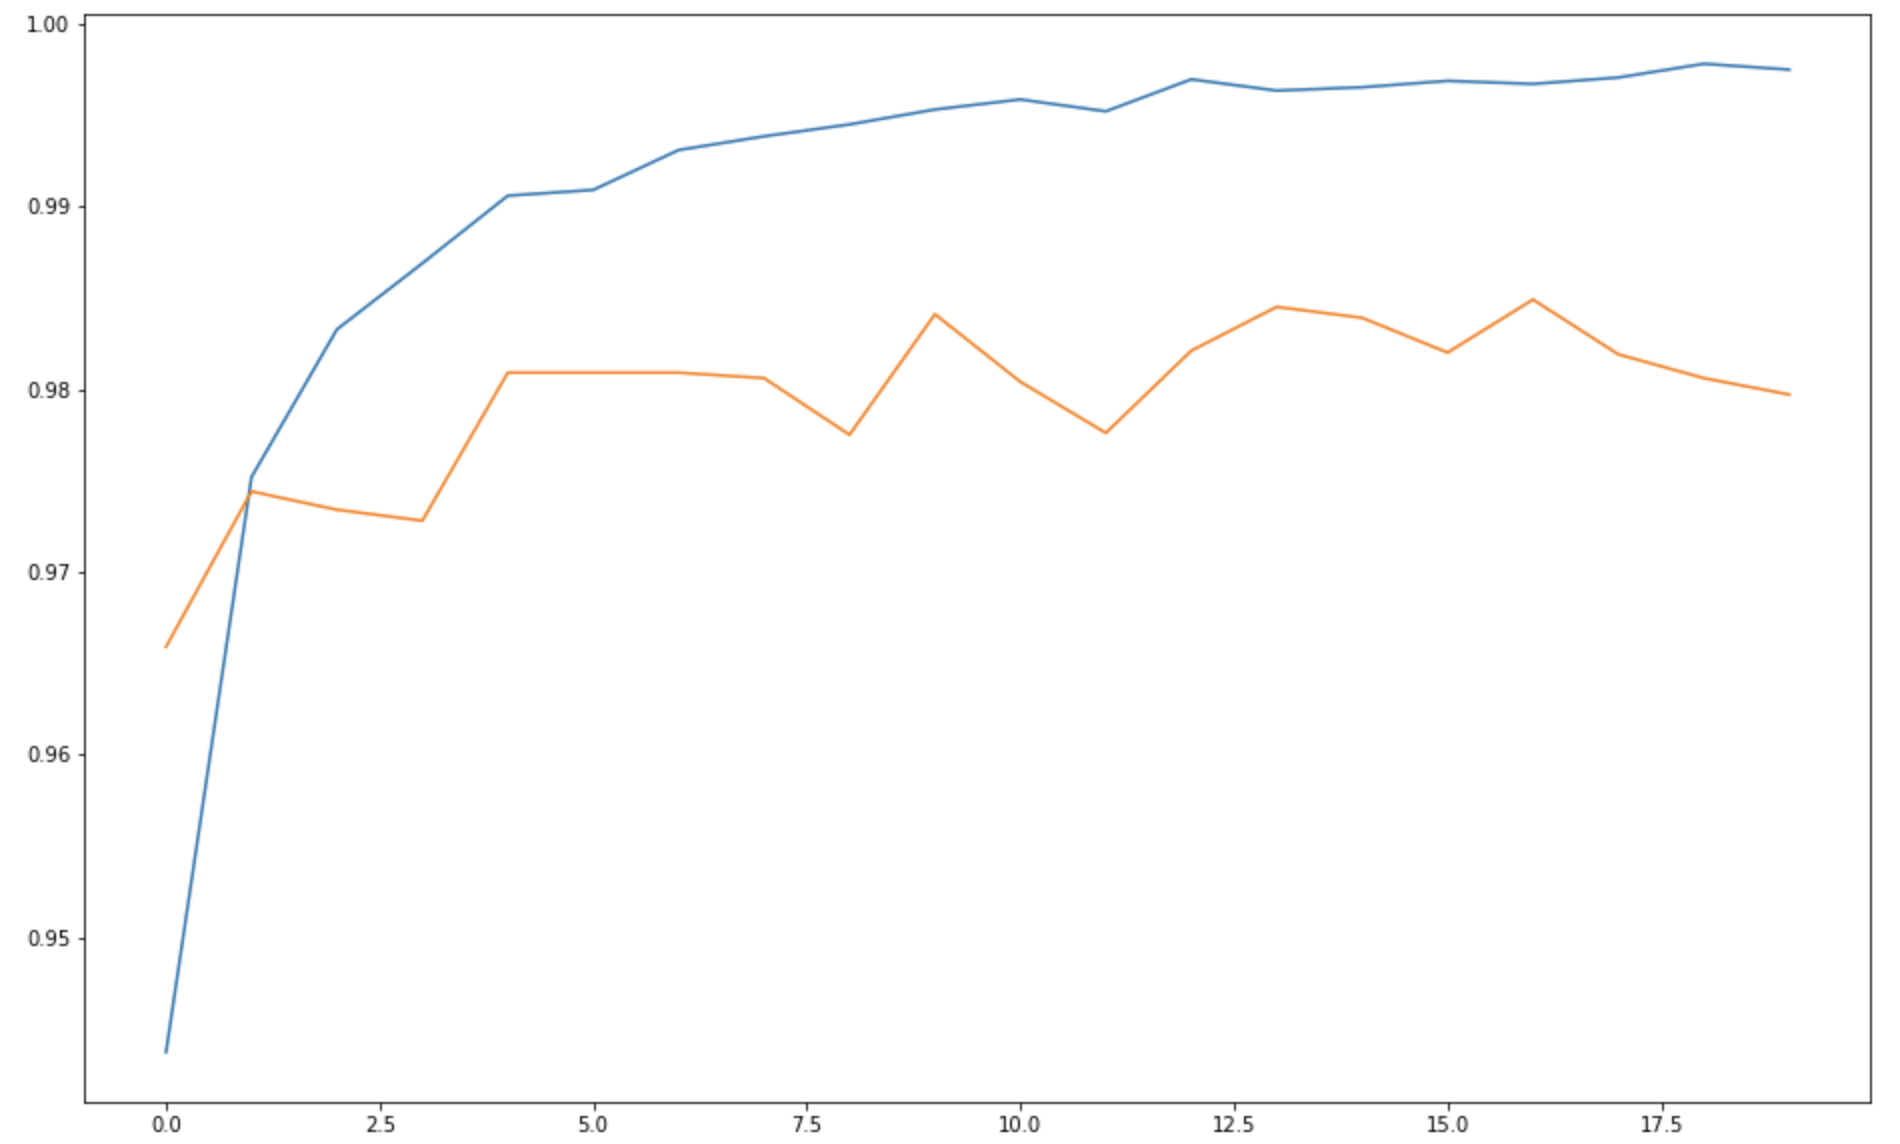
이제, 만들어진 손글씨 숫자 판별 기계로
내가 작성한 손글씨가 어떤 숫자인지 추측할 수 있을 것이다🔎